
There are many difficult things that you will have to learn and do every day while you are in the military, but making a bed military style is not one of them. All you need to do is read our article on how to make a bed military style and follow along. A bit of practice will take you a long way!
If you are in a hurry and need your bed made ASAP, quickly follow the 7 steps. First, put the fitted sheet on the mattress and the top sheet over the fitted sheet. Tuck the bottom of the top sheet under the mattress and make a diagonal fold at the corner of the top sheet. Next, tuck the corner and the diagonal fold under the mattress as well as the side of the sheet under the bed. Repeat the procedure for the other side of the mattress.
We will walk you through all the steps to make a military bed and offer a few tips for you to keep up your sleeves. So, what are you ready for? Go ahead and start reading!
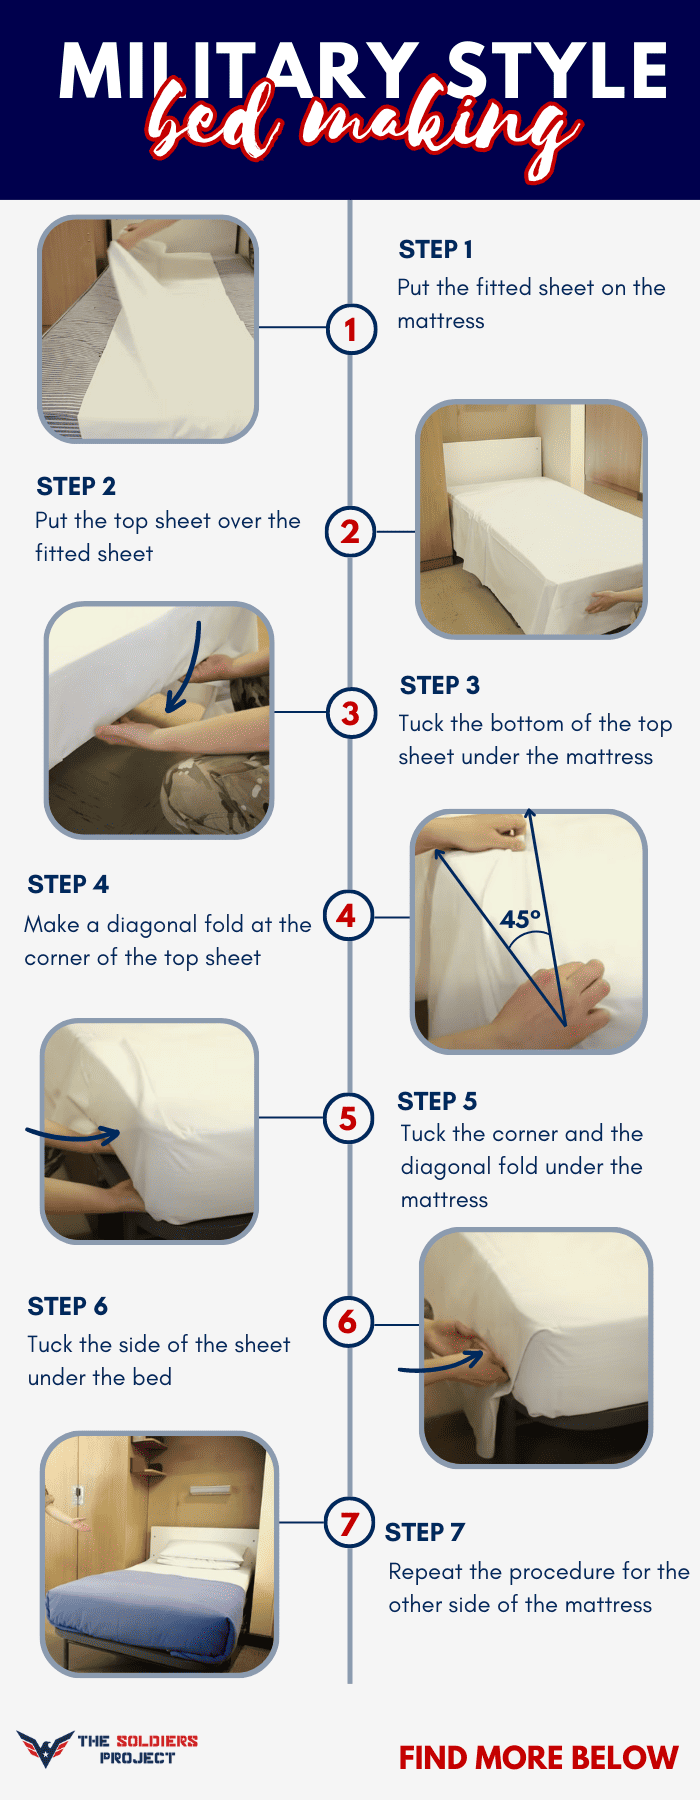
Table of Contents
- Making the Bed Military Style
- What You Will Need to Have
- What You Will Need to Do
- 1. Put the fitted sheet on the mattress
- 2. Put the top sheet over the fitted sheet
- 3. Tuck the bottom of the top sheet under the mattress
- 4. Make a diagonal fold at the corner of the top sheet
- 5. Tuck the corner and the diagonal fold under the mattress
- 6. Tuck the side of the sheet under the bed
- 7. Repeat the procedure for the other side of the mattress
- Conclusion
Making the Bed Military Style
Military bed making doesn’t have to be complicated, but it does require a bit of time and effort on your end. There are several things that you need to prepare before getting into the action.
What You Will Need to Have

You will need a fitted sheet, a top sheet, and a pillow. Oh, and if you have a wooden spoon with a long handle, grab that too!
Tip: A top sheet is also called a flat sheet.
What You Will Need to Do

1. Put the fitted sheet on the mattress
Standing at the foot of your bed, fling the fitted sheet over the mattress. Tuck it on the corner by corner using the corner elastic under the mattress, and make sure that you tuck all of the edges tightly. This way, there is little chance for it to come undone even if you move while sleeping.
2. Put the top sheet over the fitted sheet
Next, take your top sheet and lay it on top of the fitted sheet. Place the edge of the sheet with the longer hem at the head of the bed. Then, see to it that the top edge of the sheet is aligned evenly with the top of the mattress. The sides of the sheet should hang over each side of the mattress.
3. Tuck the bottom of the top sheet under the mattress
Use one hand to lift the bottom of your mattress and tuck the bottom of the top sheet under the mattress with your other hand. The sheet should go between the box spring and the mattress. Do not forget to make sure that the edges of the sheet are flattened under the mattress. Here, you can use the wooden spoon with a long handle that you prepared to tuck the sheet tightly.
4. Make a diagonal fold at the corner of the top sheet
Now, standing at the bedside, pick the top sheet up about a foot away from the foot of the bed and pull it straight up to make a diagonal fold. Lay the fold on top of the bed and use your hands to flatten it.
5. Tuck the corner and the diagonal fold under the mattress
To make sure that your bed looks neat, tuck the excess sheet hanging from the corner in step four under the mattress. While doing so, use your hands to smoothen the diagonal fold before securing it under the mattress. Here, the fold should go down over the side of the bed.
6. Tuck the side of the sheet under the bed
At this point, you can tuck the side of the top sheet under the edge of the bed. Try not to tuck the last foot of the sheet near the bed’s head. Also, fold the top side of the sheet down to get a crisp edge.
7. Repeat the procedure for the other side of the mattress
Do the same for the other side of the mattress and make sure you stretch the sheet to keep it pulled tight. Finally, at the head of the bed, throw in your pillow; be sure to center it!
Watch this video if you need more detailed visual guidance.
Depending on your branch or unit, you may be asked to make “hospital corners” for your bed. No, it’s not something we just made up! Here’s how you make them:
- Step 1: Prepare the necessary materials
You will need a flat sheet, which is a rectangular sheet with no rounded corners or elastics that make the corners stretchy for hugging the mattress.
- Step 2: Put the flat sheet on top of the bed and align it with the mattress
Lay the flat sheet on top of the bed and have the three sides hang off the mattress on the sides and the foot of the bed. Starting at the top of the bed, align the flat sheet with the mattress so that it is in a flush position.
- Step 3: Secure the bottom of the flat sheet and smooth out any wrinkles and creases
Then, round back to the foot of the bed and tuck the bottom of the flat sheet in. You will have to lift the bottom of the mattress slightly as you carry out this step. At the same time, slide your hand between the mattress and the base to make sure that the sheet is not bunching up.
- Step 4: Make a “tent” at a corner of the bed’s foot
Moving onto the corners, pick up the bottom of the sheet and make a “tent” with it by placing one hand in the center and letting the two sides fall down at 45-degree angles, and holding the sheet where the tent meets the mattress’ surface down with the other hand.
- Step 5: Tuck away the excess fabric from making the “tent” and get rid of any bunching
Tuck away any excess fabric and smooth away any bunching with your hand. It’s best to do this while still holding up your “tent”. If you are struggling, you can rest the “tent” on the mattress.
- Step 6: Let go of the “tent” and tuck it under the mattress over the just-tucked corner and side
Take the “tent” and let it fall back down the just-tucked corner and side of the mattress. Then, tuck it under the mattress and smooth out any creases as you go. Repeat this for the rest of the corner(s) and complete by smoothing out any final wrinkles.
These are the tried and true procedures for military style bed making. Although we explained it in 6-7 steps, it takes less than a minute once you know the steps. Usually, you won’t be able to nail the process on the first try. But don’t worry! As the saying goes, “practice makes perfect.”
You will be able to make the perfect military style bed in no time, and when that happens, it will be hard to revert back to your old ways. Plus, you can brag to your family and friends that your bed meets the standard of military housekeeping!
Army bed making is a good way to practice discipline. It also gives you the nice feeling of having control over your life. Who knew making your bed could kill two birds with one stone?
Conclusion
Hopefully, you now have a tidy and professional-looking military style bed. Did you enjoy this article on how to make a bed military style? Were the instructions easy to follow? Please let us know in the comments below! Also, share this with other readers, like your family and friends!

I am Everett Bledsoe, taking on the responsibility of content producer for The Soldiers Project. My purpose in this project is to give honest reviews on the gear utilized and tested over time. Of course, you cannot go wrong when checking out our package of information and guide, too, as they come from reliable sources and years of experience.