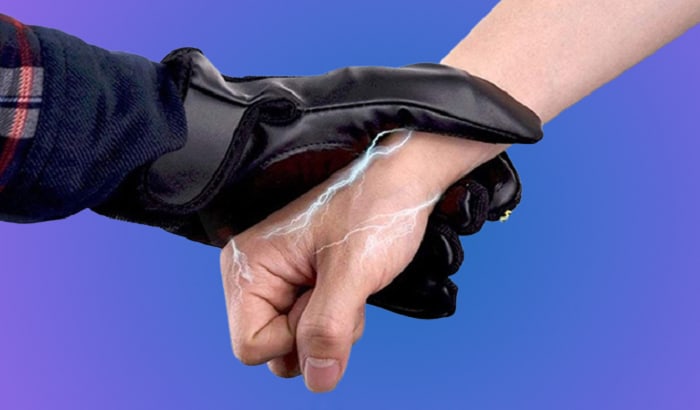
Shock gloves, also known as stun gloves, are a must-have accessory for self-defense. In addition, they can be used for military purposes. These gloves send electric shocks that temporarily disrupt muscles’ functions, which gives the wearer enough time to escape from an aggressor.
Thus, shock gloves can be understood as an alternative to tasers. You can find these gloves on e-commerce sites and online retailers. However, it is also possible to make them yourself using fairly inexpensive materials.
In this article, we will take you through the necessary steps and materials. So, if you want to learn how to make a shock glove, continue to read! In general, what you will have to do is:
- Insert the insulated glove inside the work glove and secure it with glue or tape
- Prepare the taser circuit by removing the battery and covering it with electrical tape
- Secure the circuit onto the outside of the glove with the trigger facing upward using glue or tape
- Solder the wire to the capacitor’s wire, then wrap the pin and metal parts in electric tape
- Fold the sheets of aluminum foil into sheets and tape them onto the glove’s pointer and ring finger
- Tape the soldered wires to the foils’ top and complete the shock glove by plugging in the battery and charging it
- Put on the gloves and give it a try by hitting something metal, like a light pole
For the details of each step, read on. We will feature all the materials you need as well as step-by-step instructions in the two sections below.
Table of Contents
- What You Will Need to Make a Shock Glove
- What You Will Need to Do to Make a Shock Glove
- Step 1: Insert the insulated glove inside the work glove and secure it with glue or tape
- Step 2: Prepare the taser circuit by removing the battery and covering it with electrical tape
- Step 3: Secure the circuit onto the outside of the glove with the trigger facing upward using glue or tape
- Step 4: Solder the wire to the capacitor’s wire, then wrap the pin and metal parts in electric tape
- Step 5: Fold the sheets of aluminum foil into sheets and tape them onto the glove’s pointer and ring finger
- Step 6: Tape the soldered wires to the foils’ top and complete the shock glove by plugging in the battery and charging it
- Step 7: Put on the gloves and give it a try by hitting something metal, like a light pole
- Safety Caution
- Conclusion
What You Will Need to Make a Shock Glove
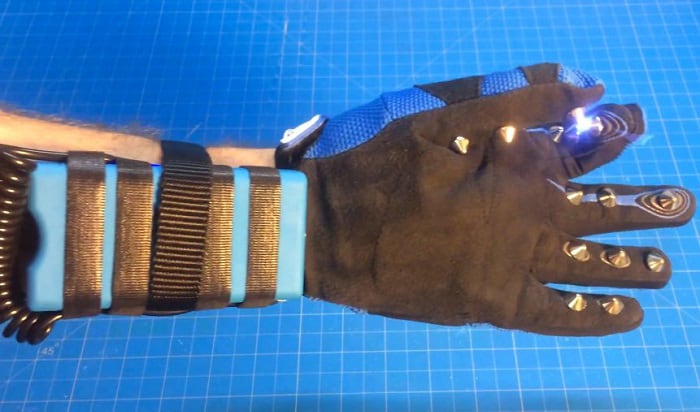
You will need gloves (Duh!)—a leather work glove and an insulated rubber glove. Generally, people will only wear a shock glove on one hand. So, get one for your dominant hand.
Note: However, if you want to wear it on both hands, you can also get pairs.
The insulated rubber glove should be slightly smaller than the leather work glove. Make sure you purchase good-quality gloves. After all, these are made to protect you and your well-being. There are plenty of reliable ones on Amazon and eBay.
You will also need a taser circuit, some glue or duct tape, electric tape, solder, two sheets of aluminum foil, and a few basic hand tools to work with electricity.
You should be able to find all these materials easily online or offline. They are fairly inexpensive, so it is entirely possible to make a pair of shock gloves for less than $10! For this price, the gloves are indeed worth the value. Once you have everything ready, go ahead and continue to read. We will take you through what you will need to do.
What You Will Need to Do to Make a Shock Glove
Step 1: Insert the insulated glove inside the work glove and secure it with glue or tape
Begin by putting the insulated glove inside the work glove. It is important that you do not skip this step to ensure safety. It minimizes the chance of shorting the capacitor into your hand. You should secure the opening of the two gloves with glue or duct tape, either will work.
Top Tip: if you are using glue, make sure it is super glue—the high-quality type to seal the opening.
Step 2: Prepare the taser circuit by removing the battery and covering it with electrical tape
Then, take the taser circuit that you have prepared and remove the battery before you proceed. Except for the pins, cover it completely with electrical tape. Mark the trigger and short the capacitor using a screwdriver.
Note: Please be very careful while doing this step. Since you are working with circuits that can “act up” at any time, remember: better safe than sorry!
Step 3: Secure the circuit onto the outside of the glove with the trigger facing upward using glue or tape
Place the circuit onto the outside of the glove and position the trigger to face upward. The capacitor should be facing towards the fingers at a reasonable distance. Secure it with glue or tape. Make sure that it will not fall off the gloves.
Step 4: Solder the wire to the capacitor’s wire, then wrap the pin and metal parts in electric tape
Now, solder a wire to the pin on the capacitor. Use the hand tools that you have prepared before starting the procedure. Wait a few minutes for the solder to cool down. Wrap the pin and the wire’s metal parts in electric tape.
Step 5: Fold the sheets of aluminum foil into sheets and tape them onto the glove’s pointer and ring finger
Next, take two sheets of aluminum foil. Fold the sheets into strips about the size of your finger and roughly half the length. Tape the strips to the glove’s pointer finger and ring finger using electrical tape.
You should leave as much foil showing as you can, while also making sure that the foil is extending from above the knuckle down the first joint. It is important because it helps prevent the capacitor from accidentally shorting. Finally, check that the foil is only on the fingers’ fronts.
Step 6: Tape the soldered wires to the foils’ top and complete the shock glove by plugging in the battery and charging it
Pick up the wires that are soldered to the pins and tape them to the foil’s top. Make sure you do this carefully and firmly. Pay attention to the way you attach; it should not fall off from the foil ever. Once you do this, you are good to go! Put the glove on, plug in the battery, and charge it by pressing the trigger.
Step 7: Put on the gloves and give it a try by hitting something metal, like a light pole
Before you show the shocking gloves off to your friends:
- Test them out by hitting a metal surface, like a light pole. The two foil strips should come into contact with the metal.
- Do not be surprised if you see sparks or hear electricity being sent from the capacitor.
- Go ahead and use your homemade shock glove!
Safety Caution
However, be very careful with it. It is a dangerous device, so you must use it with care. Do not intentionally hurt others unless your property or safety is threatened. Also, make sure that you never let the two foil strips or capacitor pins touch each other.
Conclusion
Congratulations! You now know all the materials you need and the steps to take to make electric gloves. Hopefully, you have picked up a lot of useful information from our article on how to make a shock glove.
These gloves are good self-defense and protective gear that anyone should have. However, it is important not to forget that they can be dangerous. So, always use it with care. Do not use it to zap just anyone; they can be seriously hurt! Plus, you can get into a lot of trouble.
If you have any other thoughts or questions regarding this topic, let us know in the comments below. We look forward to hearing from you! Feel free to share this article with anyone you think will benefit or appreciate the content as well. Until next time!

I am Everett Bledsoe, taking on the responsibility of content producer for The Soldiers Project. My purpose in this project is to give honest reviews on the gear utilized and tested over time. Of course, you cannot go wrong when checking out our package of information and guide, too, as they come from reliable sources and years of experience.